The post How to Electroplate SLS Nylon 3D Prints: A Guide to Metallic Finishes appeared first on IN3DTEC | Prototyping & On-demand manufacturing services.
]]>The post How to Electroplate SLS Nylon 3D Prints: A Guide to Metallic Finishes appeared first on IN3DTEC | Prototyping & On-demand manufacturing services.
]]>The post Electroplating Metal 3D Prints: A Guide to Enhancing Surface Finishes appeared first on IN3DTEC | Prototyping & On-demand manufacturing services.
]]>The post Electroplating Metal 3D Prints: A Guide to Enhancing Surface Finishes appeared first on IN3DTEC | Prototyping & On-demand manufacturing services.
]]>The post Electroplating vs. Physical Vapor Deposition (PVD) Coating: A Comparative Analysis appeared first on IN3DTEC | Prototyping & On-demand manufacturing services.
]]>In the realm of surface finishing and coating technologies, Electroplating and Physical Vapor Deposition (PVD) stand out as two widely adopted methods. Both techniques are essential in enhancing the appearance, durability, and functionality of metal surfaces across various industries. However, they differ significantly in their processes, applications, and benefits. Let’s delve into a comparative analysis of Electroplating and PVD coating.
Electroplating: An Overview
Electroplating is a process that uses an electric current to deposit a thin layer of metal onto a substrate. This method involves immersing the substrate and a metal anode in an electrolyte solution. When an electric current is applied, metal ions from the anode dissolve and are deposited onto the substrate, forming a coherent metal coating.
Applications of Electroplating:
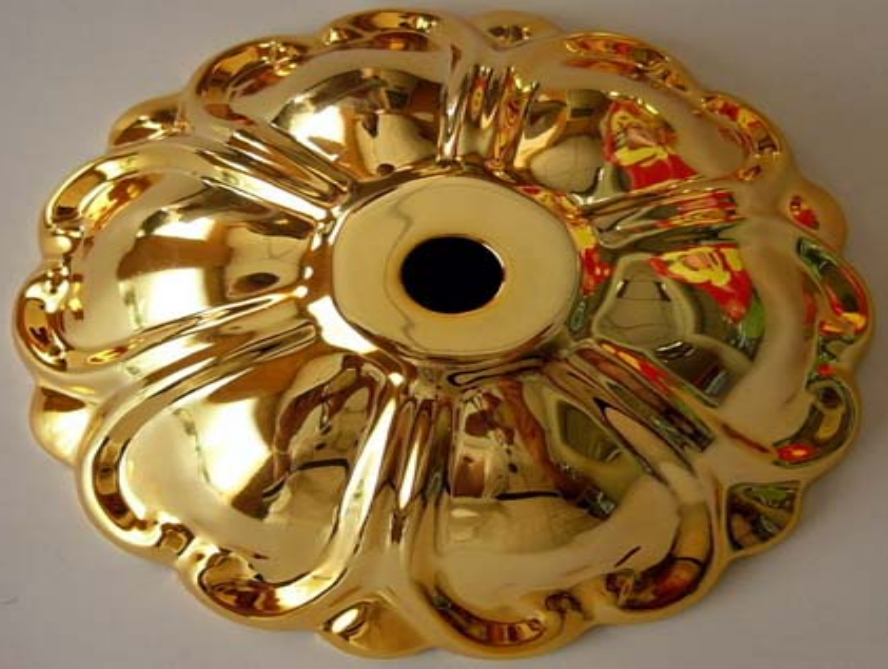
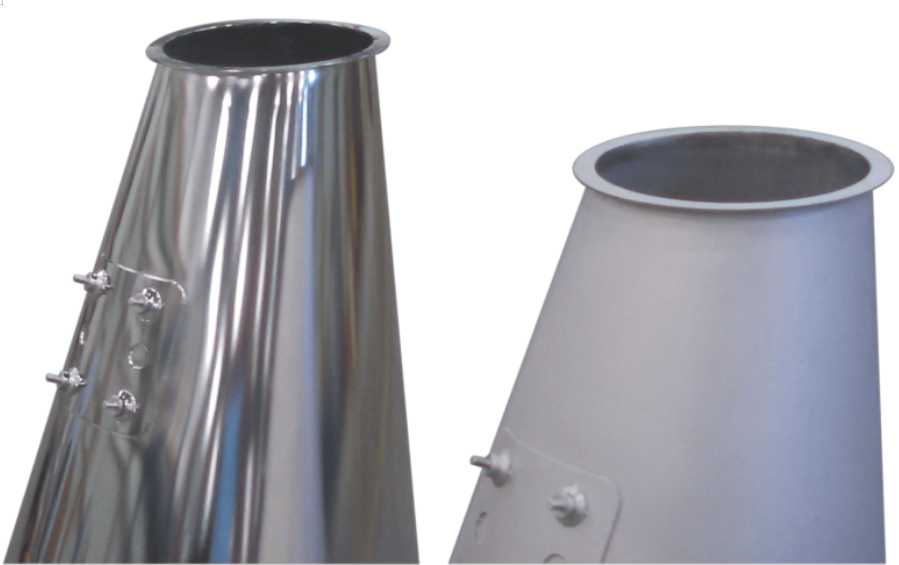
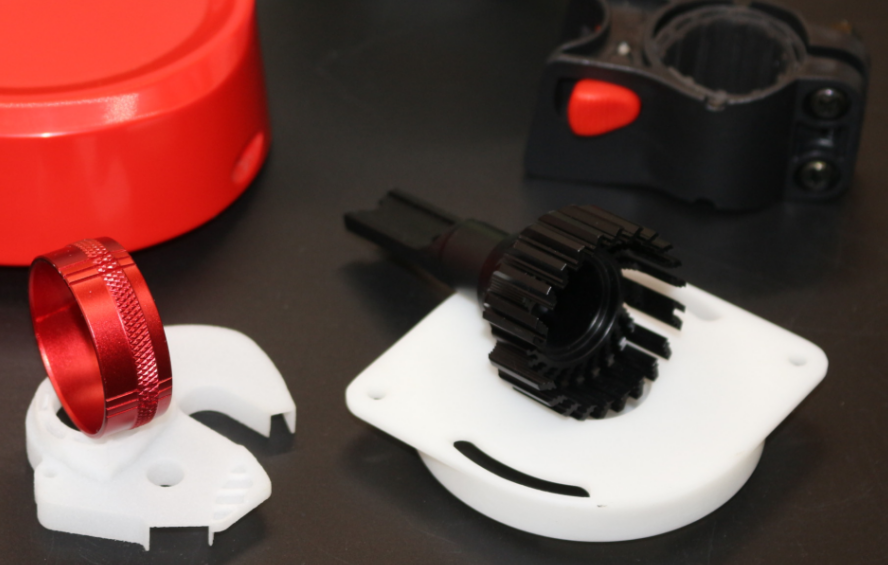
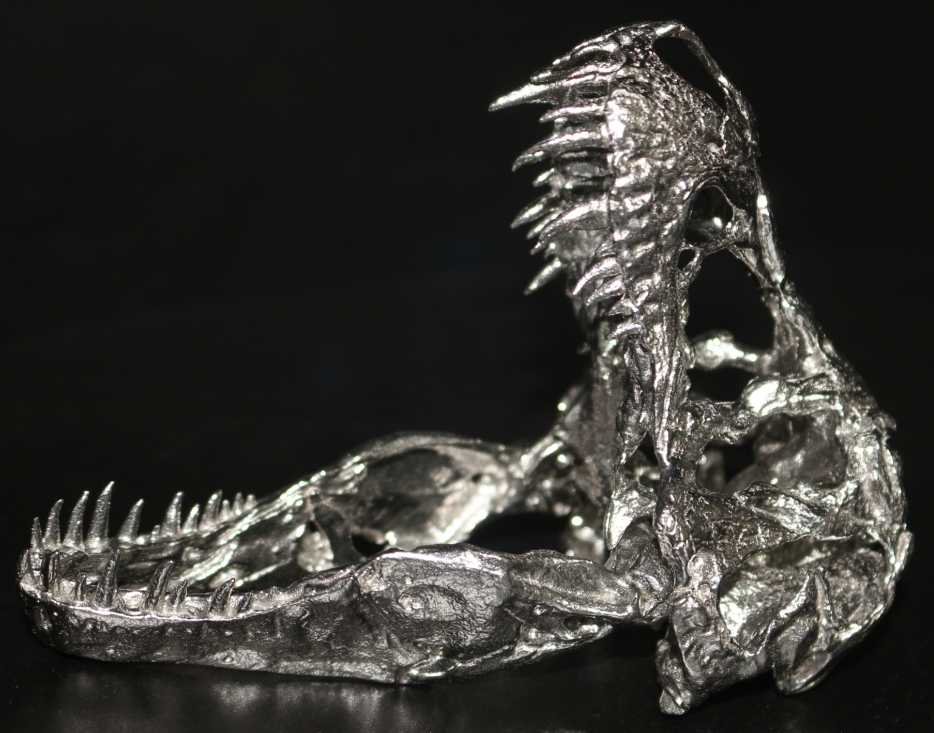
– Corrosion Resistance:For metals, Electroplating is extensively used to protect metals from corrosion. Commonly plated metals include zinc, nickel, and chromium. For plastics, it can give them a metallic appearance and a mirror-like finish.
– Aesthetic Enhancement: It is often employed to enhance the appearance of items like jewelry, automotive parts, and household fixtures.
– Electrical Conductivity: Electroplating with metals like gold and silver is used in electronics to improve electrical conductivity and solderability.
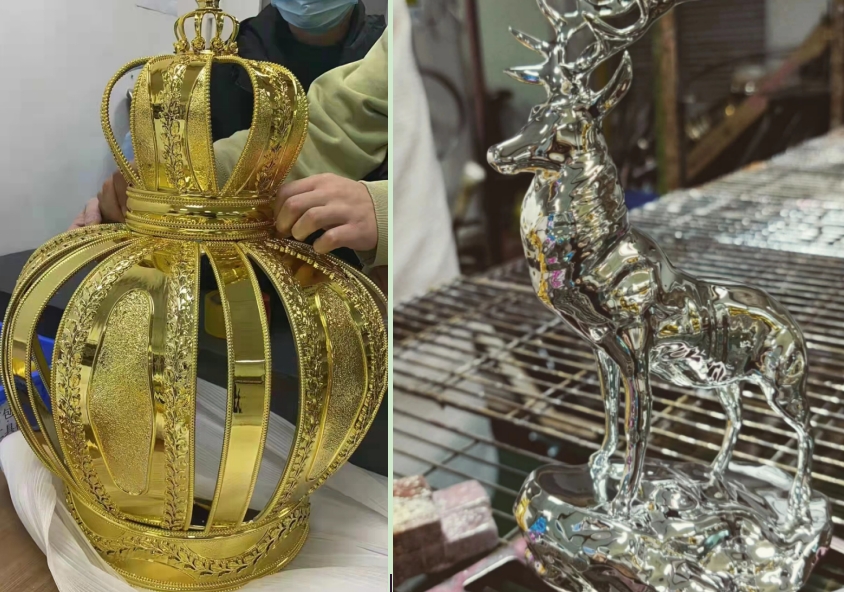
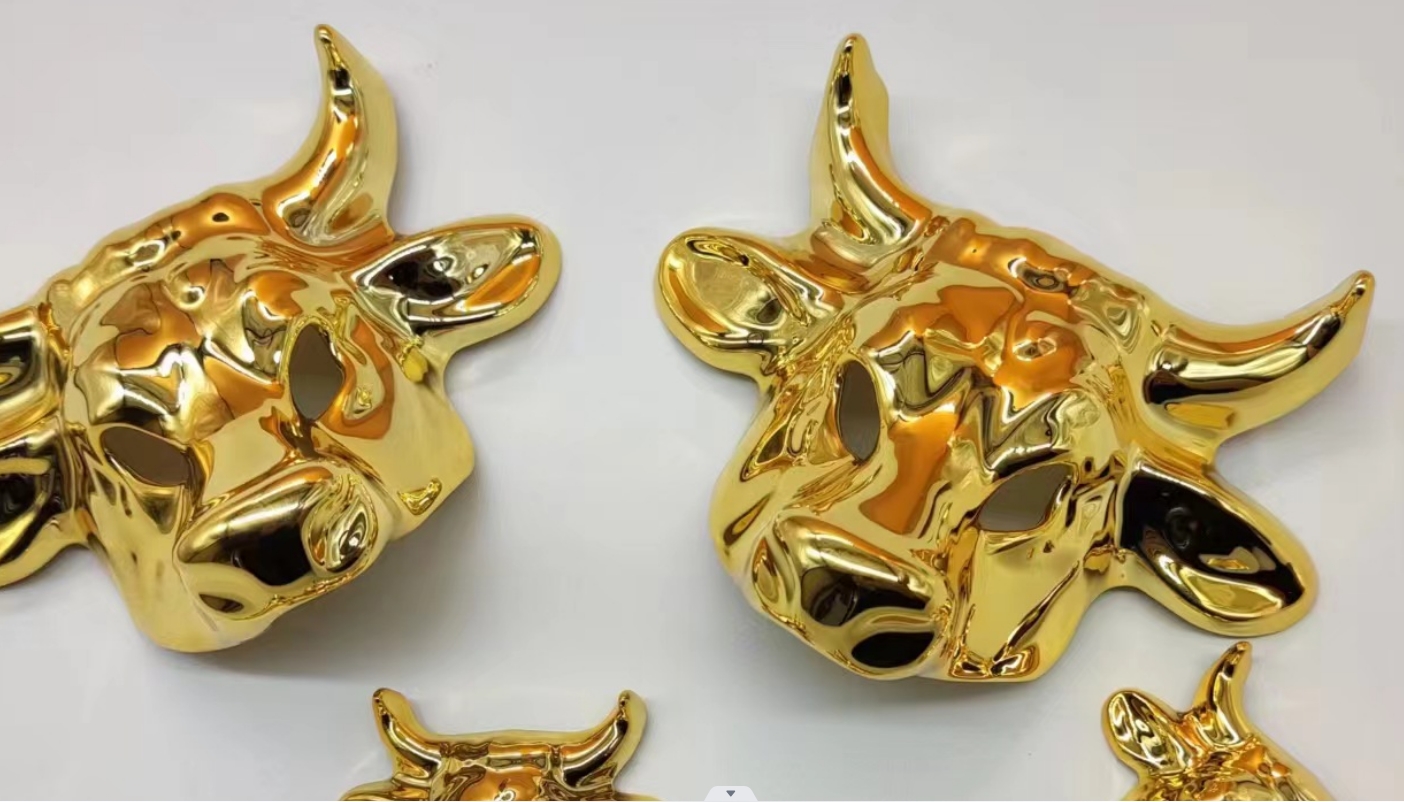
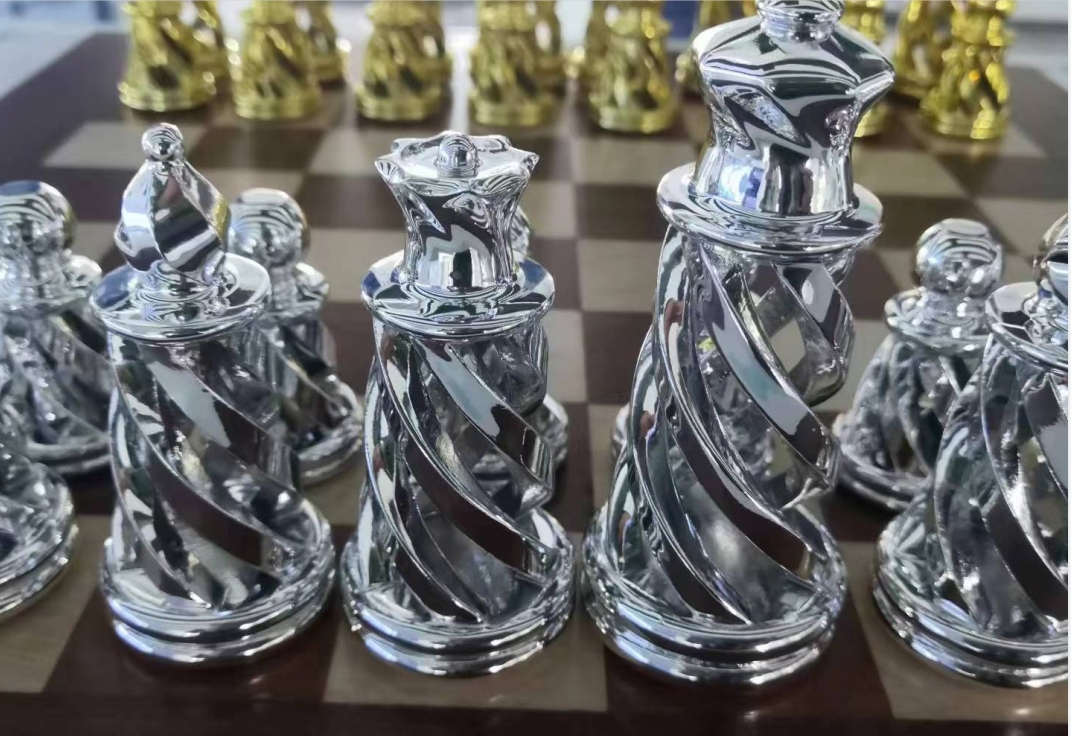
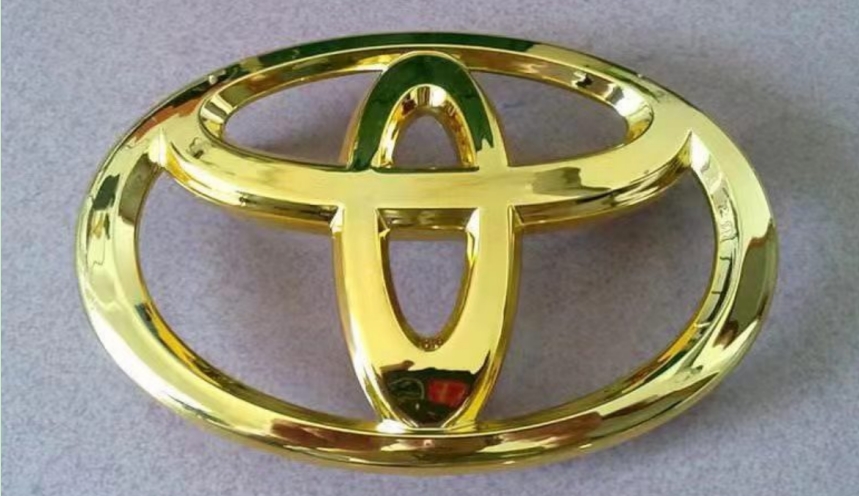
Several of Projects of electroplating parts by IN3DTEC
Advantages of Electroplating:
– Cost-Effective: Generally, electroplating is less expensive compared to other coating methods.
– Versatility: It can coat a wide range of metals and alloys.
– Smooth Finishes:The process can produce very smooth and uniform coatings.
Limitations of Electroplating:
– Environmental Impact: The use of toxic chemicals and heavy metals poses significant environmental and health hazards.
– Thickness Limitation: The coating thickness is relatively limited, which might not be sufficient for some applications.
– Adhesion Issues:The bond between the coating and the substrate can be weaker compared to other methods.
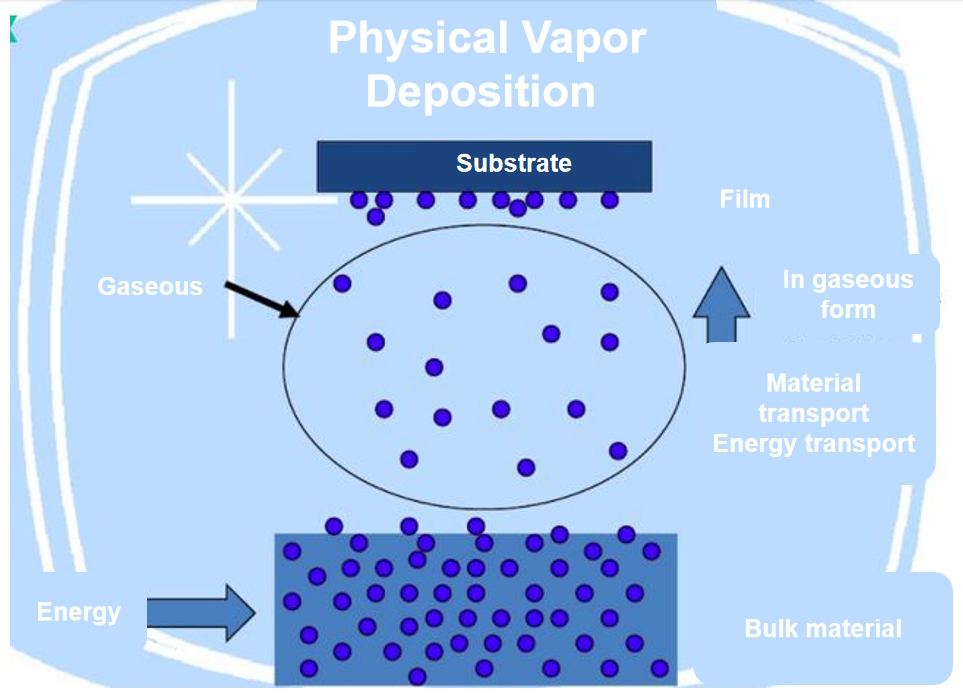
Physical Vapor Deposition (PVD) Coating: An Overview
Physical Vapor Deposition (PVD) is a vacuum-based process where materials are vaporized and then deposited onto a substrate to form a thin film. PVD encompasses various techniques, such as sputtering and evaporation, to achieve the desired coating.
Applications of PVD Coating:
– Tooling and Cutting Instruments: PVD coatings are widely used to enhance the hardness and wear resistance of cutting tools and dies.
– Decorative Finishes: PVD is utilized for providing durable and aesthetically pleasing finishes on consumer goods like watches and electronic devices.
– Protective Coatings: It offers excellent resistance to corrosion and wear, making it suitable for aerospace and automotive components.
Advantages of PVD Coating:
– High Durability:PVD coatings are known for their exceptional hardness and wear resistance.
– Environmental Friendliness:The process is cleaner and more environmentally friendly compared to electroplating.
– Superior Adhesion: PVD provides excellent adhesion to the substrate, resulting in a long-lasting coating.
Limitations of PVD Coating:
– Higher Costs: PVD coating is generally more expensive due to the complexity of the process and equipment required.
– Process Complexity:The vacuum environment and high temperatures involved can limit the size and shape of the components that can be coated.
– Preparation Requirements: Substrates often require extensive preparation to ensure successful coating adhesion.
Comparative Analysis
- Process and Application:
– Electroplating is a simpler, more cost-effective process suitable for mass production and a variety of metals & plastics. It is ideal for applications where a moderate level of corrosion resistance and aesthetic enhancement are required.
– PVD coating, while more complex and costly, offers superior durability, environmental benefits, and exceptional performance in high-stress applications.
- Environmental and Health Impact:
– Electroplating poses significant environmental and health risks due to the use of hazardous chemicals.
– PVD is a more environmentally friendly option, producing fewer hazardous byproducts.
- Coating Properties:
– Electroplated coatings are generally softer and less durable than PVD coatings.
– PVD coatings provide enhanced hardness, wear resistance, and superior adhesion, making them suitable for high-performance applications.
If your component requires this kind of follow-up treatment, feel free to contact our team for an instant quote, [email protected]
Or find this selection under SLA-Standard ABS-Electroplating from our online store
Conclusion
Choosing between electroplating and PVD coating depends on the specific requirements of the application, including cost, environmental considerations, and the desired properties of the final product. While electroplating offers a cost-effective solution for a wide range of applications, PVD coating provides superior durability and environmental benefits, making it the preferred choice for high-performance and environmentally conscious applications.
Understanding the strengths and limitations of each method allows for informed decision-making, ensuring the optimal surface finishing solution for various industrial needs.
The post Electroplating vs. Physical Vapor Deposition (PVD) Coating: A Comparative Analysis appeared first on IN3DTEC | Prototyping & On-demand manufacturing services.
]]>The post 8 Things You Need to Know About Anodizing Aluminum appeared first on IN3DTEC | Prototyping & On-demand manufacturing services.
]]>The post 8 Things You Need to Know About Anodizing Aluminum appeared first on IN3DTEC | Prototyping & On-demand manufacturing services.
]]>The post Painting vs Powder Coating appeared first on IN3DTEC | Prototyping & On-demand manufacturing services.
]]>What is Powder Coating?
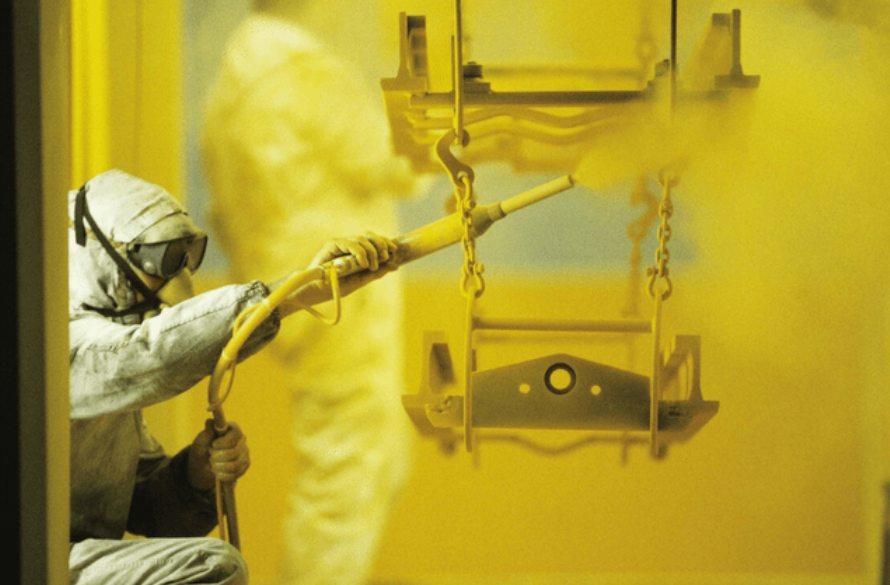
Powder coating refers to the process of electrostatically applying dry, finely ground colored coating resin particles onto a surface. The particles are charged using a spray gun to adhere to the surface. Excess powder is then removed, and the coated object is baked in an oven.
Adhesion: Powder coating relies on electrostatic attraction and heat to form a strong bond between the powder and the surface.
Surface Finish: Powder coating provides a durable and attractive surface finish with a smooth, even appearance. It offers a variety of colors and finishes, including textures and metallic options.
Thickness: Powder coatings are typically thicker than traditional liquid coatings, ranging from 20 to 200 micrometers.
Curing: The coated object is baked at high temperatures, usually around 200-220°C (390-430°F), melting the powder particles and fusing them into a continuous film.
Environmental Impact: Powder coating is considered more environmentally friendly than traditional coating methods. Excess powder can be reused, resulting in lower VOC emissions and less waste generated.
Advantages:
- Environmental friendliness
- Durabilityand long lasting
- Cost effective for large volume parts
- Much faster compared to painting, the setup time is longer.
Disadvantages:
- Compared to painting, it has limited colors
- Higher setup cost than painting
- It needs proper surface preparation
- Difficult to repair if any flaws
Ideal application for powder coating:Architectural and Construction,Outdoor Furniture and Appliances,Industrial Equipment and Machinery,Healthcare and Laboratory Equipment,Retail Displays and Fixtures
In conclusion, both painting and powder coating are effective methods for adding protection and enhancing the appearance of various surfaces. When choosing between painting and powder coating, it is essential to consider factors such as the desired finish, application method, durability, environmental impact, and specific requirements of the project.
The post Painting vs Powder Coating appeared first on IN3DTEC | Prototyping & On-demand manufacturing services.
]]>The post Surface Finishes For CNC Machined Parts appeared first on IN3DTEC | Prototyping & On-demand manufacturing services.
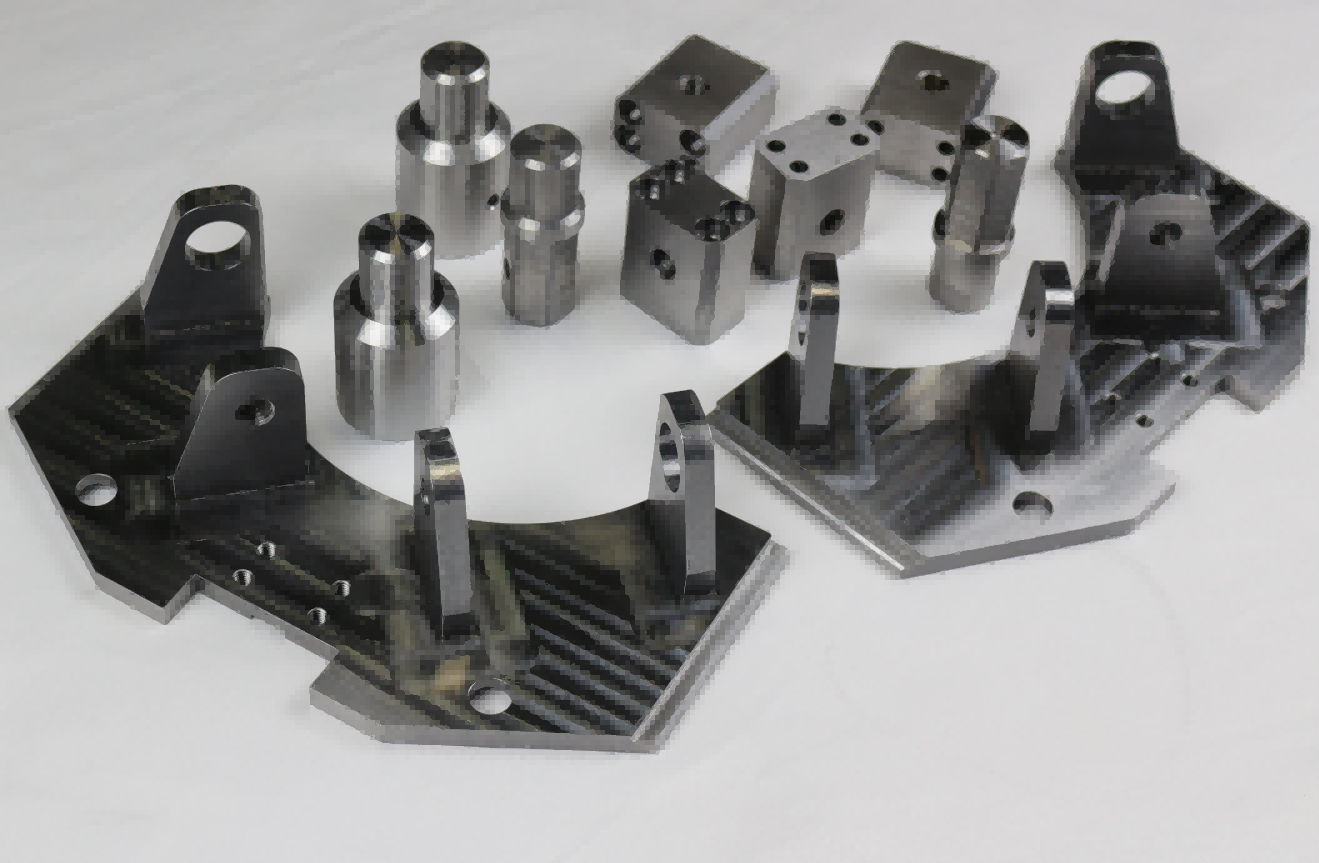
]]>The first impression of any CNC machined part lies in its external appearance and visual representation to onlookers. This crucial aspect has led modern industrialists and manufacturers to prioritize the aesthetics and functionality of their products.
To achieve the desired aesthetic appearance, manufacturers turn to surface finishing treatments for their CNC-machined parts. Surface finishing is a comprehensive and effective process that eliminates outer remnants, scars, threads, blurs, and any unaesthetic marks from the surface of the products.
By employing surface finishing techniques, manufacturers can greatly enhance the overall quality and appeal of their CNC-machined parts. The treatments not only remove imperfections but also provide additional benefits such as improved durability, resistance to corrosion, and enhanced performance.
In this article, we aim to provide you with an overview of common surface finishes available for CNC machined parts.
Varieties of CNC Machining Surface Finishes
Some manufacturers need extreme surface finishing, and the rest require very little. Keeping this point in mind, there are three categories of surface finishing for CNC-machined parts. Find out which one is suitable for your expectations and appeals to your customers.
1. As Machined Surface Finishes
Machining finishing is a very affordable option for manufacturers because it does not incur any extra cost due to being done by a CNC machine.
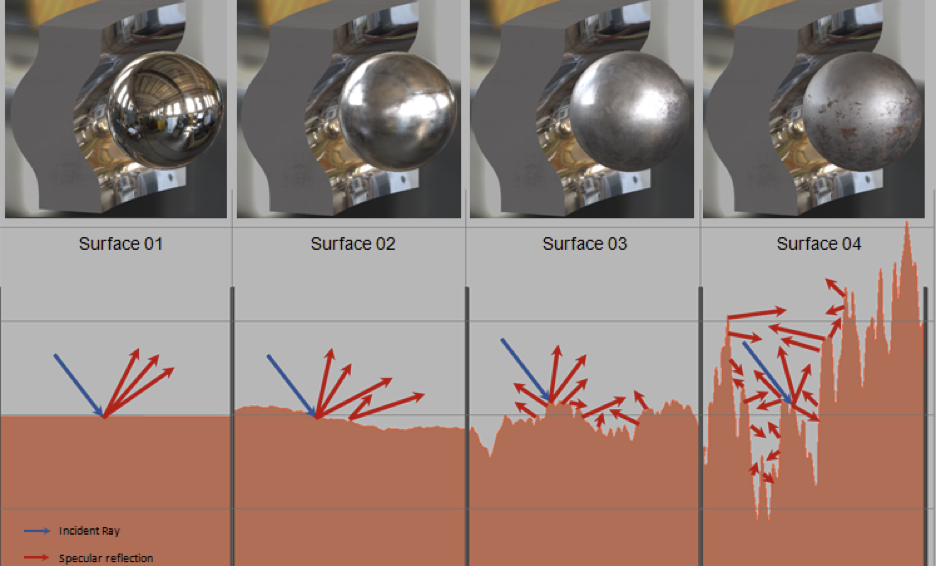
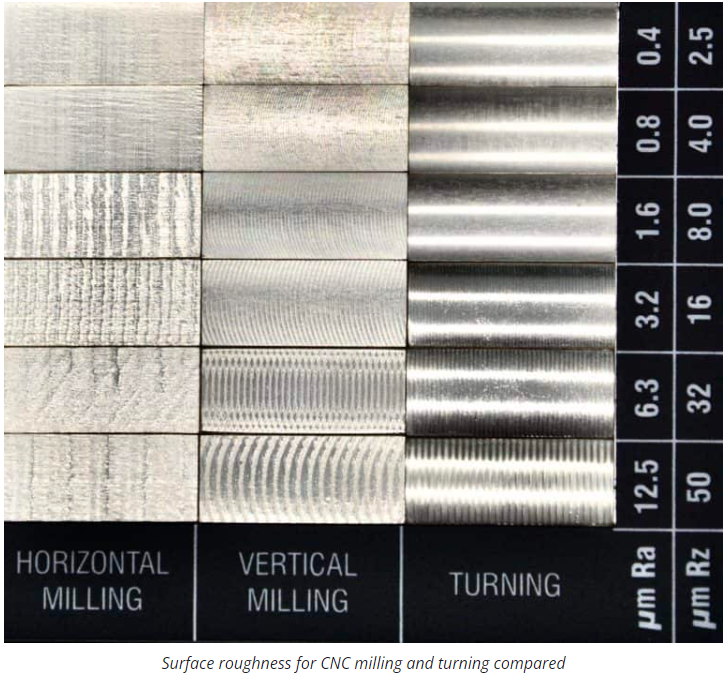
This surface finish is counted in terms of the Ra factor, which is the surface roughness that is defined as the deviation of a machined profile from the ideal surface.
Ra is the foundation of the calculation of surface finish, surface integrity, waviness, and flatness. Some ideal values of Ra are 3.2, 1.6, 1.8, and 0.8 micrometers. The lower the value of Ra, the higher the dimensional accuracy or tolerances.
Machining finishing is the best for those who have a tighter budget. However, it keeps the surface of CNC-machined parts filled with tool marks. In this way, it is not perfect for high-value projects.
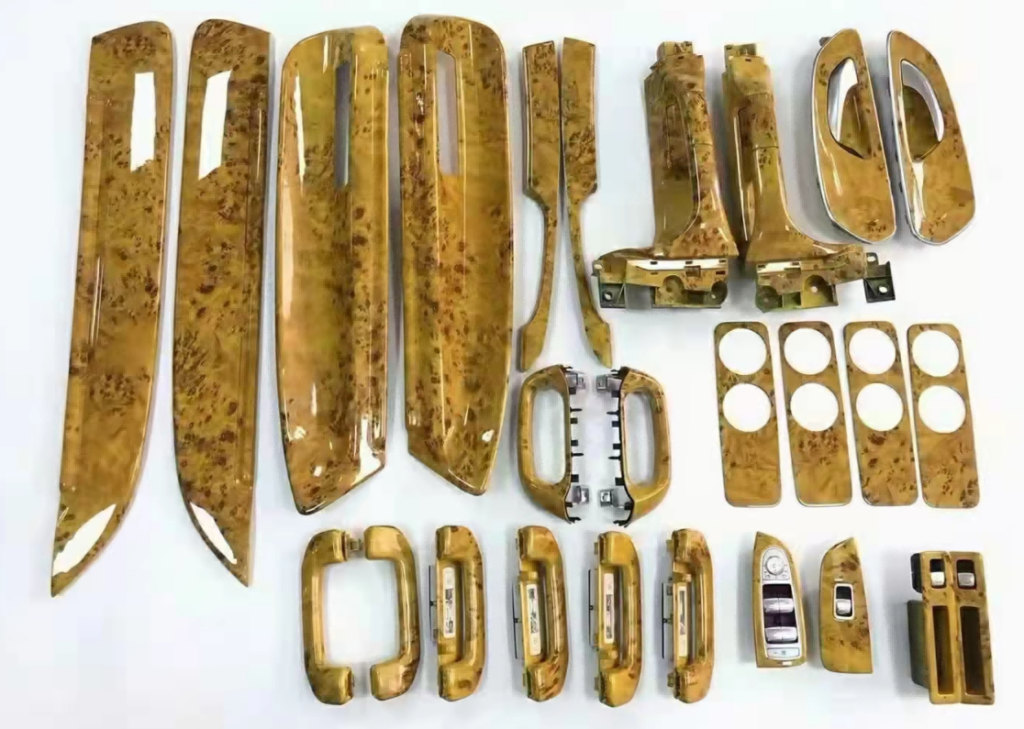
2. Chemical Surface Finishes
Coating the surface of CNC-machined parts with another material is termed “chemical finishing. We can say that it is an extra layer of protection against abrasion, corrosion, and external factors.
Chemical finishing offers an aesthetic appeal to the parts because of the addition of their colour, shine, and other similar attributes. Discuss some of its types.
Anodizing
Anodizing is a phenomenon in which the immersion of a part in an electrolyte solution results in the formation of a protective sheath of oxide on the surface. Anodizing sheaths fall into two categories on the basis of applications.
Type I anodizing (up to 25 microns) is perfect for decorative and aesthetic purposes. While Type II anodizing (25 to 150 microns) is great for providing resistance against corrosion and abrasion to the material due to its thick oxide layering.
Alodine Coating
Alodine means a chromate layer, and alodine coating implies the implementation of a chromate thin coating on the CNC machined parts’ surface to boost their capability against corrosion, heat, and adhesion, resulting in an improvement in their longevity and durability. It works very well for aluminum and non-ferrous components.
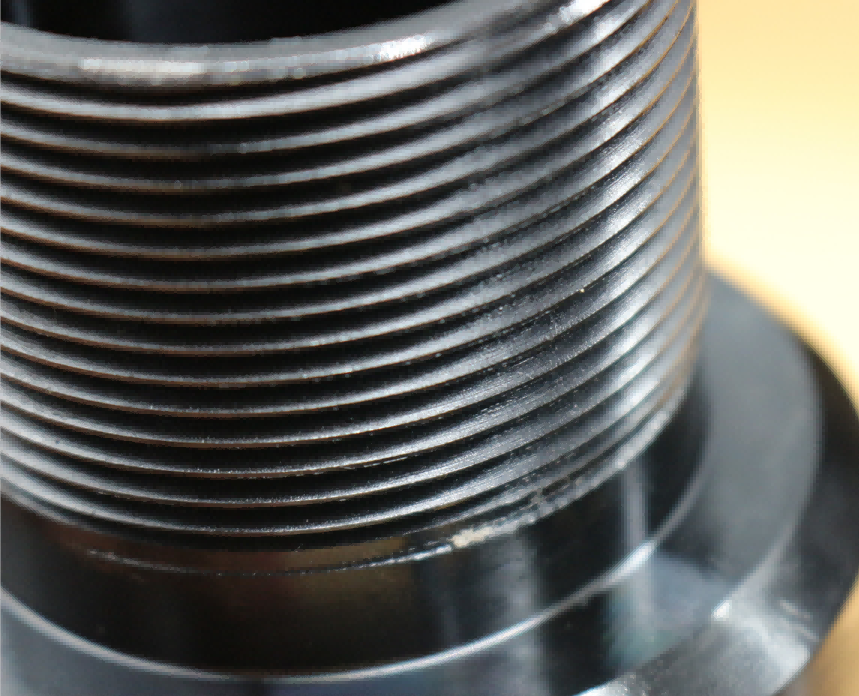
Black Oxide Coating
Black oxide coating is a surface finishing process in which a black oxide coating is applied to the surface of CNC machined parts throughout for shielding against different contaminants and physical damages.
It improves the capacity to battle corrosion, offers wear resistance, and offers high lubricity. This surface finishing is the best option for steel, copper, and other alloys that form well-bonded bonds with oxygen molecules.
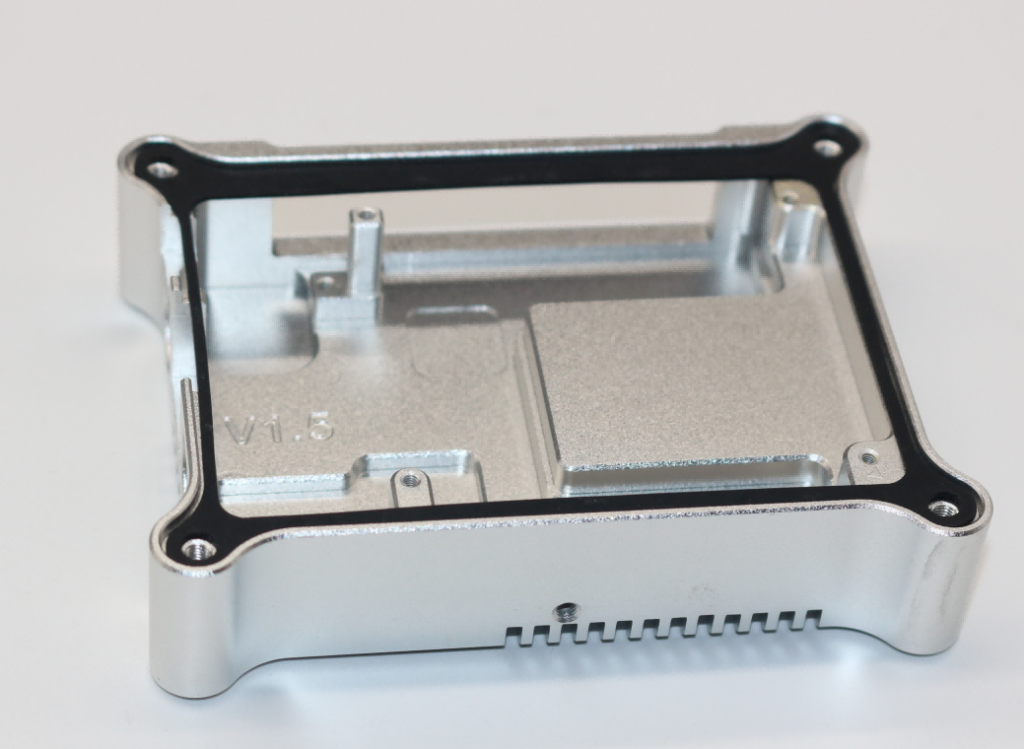
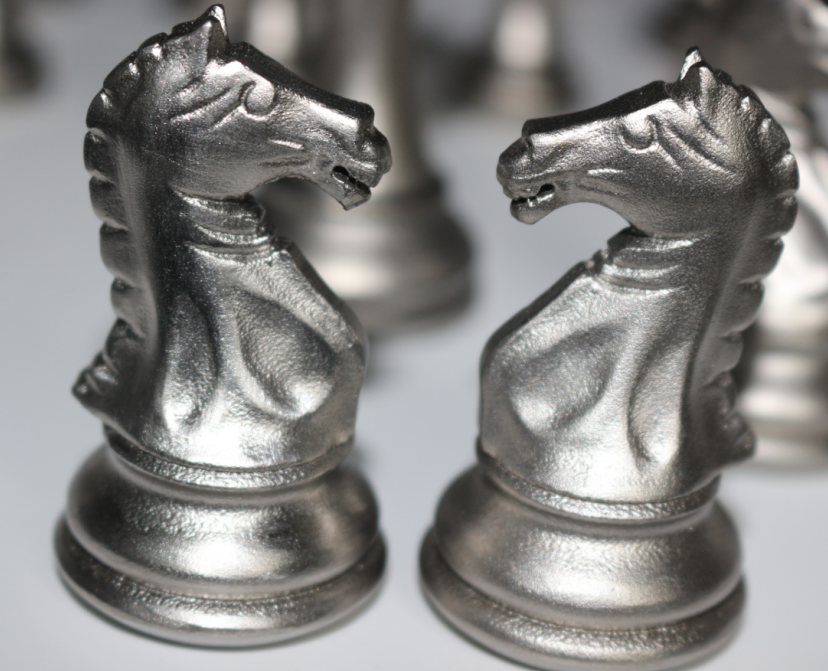
Electroplating Surface Finishes
Electroplating consists of two words: electric and plating. It involves the deposition of a metallic sheath throughout the surface of a part with the help of passing electricity to reach its melting temperature.
Electroplating is a very effective protection for the workpiece and protects the inner components from all kinds of contaminants and corrosive impacts.
3. Mechanical Surface Finishes
Under mechanical finishes, workpiece undergo multiple cycles of stresses and abrasions with corresponding treatments to obtain a smooth surface on the final products. See its types below.
Bead Blasting
Bead blasting involves the bombardment of spherical beads of glass or ceramic on the surface of CNC machined parts to get their textured, matte surface finish, eliminate imperfections, and create their uniform appearance.
Powder Coating
Attempt to layer a waxy powder on the surface of a part to make it durable and receive its versatile performance. Such powder coats are capable of resisting scratches and chips and do not become obsolete over time.
Brushing
It is a kind of surface treatment, rather than surface finishing. It harnesses a metal-wired brush or an abrasive pad to clean the surface and physically throw out all contaminants or particles on the surface of the parts.
Painting
The use of lacquer and polyurethane in their liquid form to apply over the surface of CNC machined parts to protect the surface from exposure to water, contaminants, dirt, and atmospheric irregularities is known as painting.
Painting CNC surface finishing is a great option to improve the lifespan by keeping corrosion and abrasion at bay by covering the whole external body of a part.
In conclusion, surface finishes for CNC machined parts are instrumental in achieving the desired quality, functionality, and aesthetics. By utilizing the appropriate surface finishing techniques, manufacturers can enhance the performance, durability, and overall value of their CNC machined components.
The post Surface Finishes For CNC Machined Parts appeared first on IN3DTEC | Prototyping & On-demand manufacturing services.
]]>The post surface finishes for metal 3d prints appeared first on IN3DTEC | Prototyping & On-demand manufacturing services.
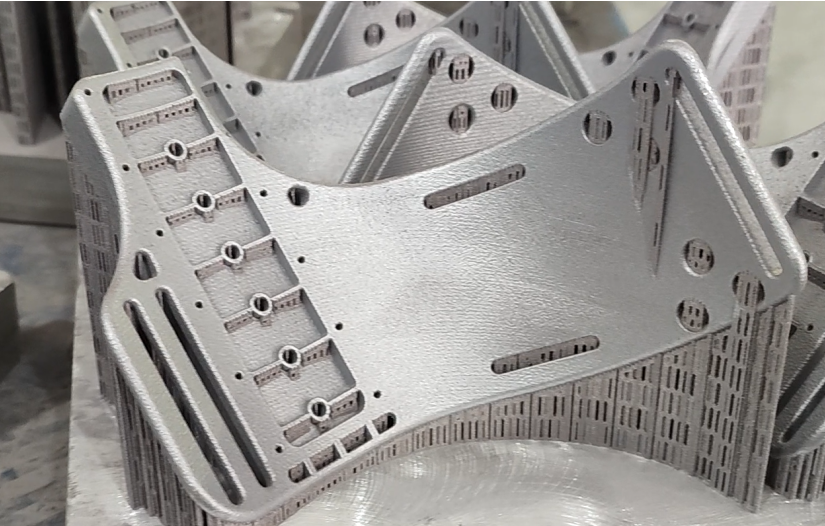
]]>Metal 3D printing has completely revolutionized the manufacturing industry by enabling the rapid and cost-effective production of complex metal parts.
However, the inherent nature of the metal 3D printing process often results in surfaces that may require additional treatment to achieve the desired aesthetics, functionality, and performance. This is where surface finishing becomes crucial.
In this article, we will explore various surface finishes specifically tailored for metal 3D prints. These techniques not only improve the appearance but also enhance the mechanical performance, surface quality, and suitability for specific applications.
As-Printed Finish:
This type of surface typically has visible layer lines and some traces resulting from the removal of supports. The roughness is RA7. However, even without surface treatment, it does not affect the accuracy of the part. This surface finish is also a good choice for parts that require secondary processing.
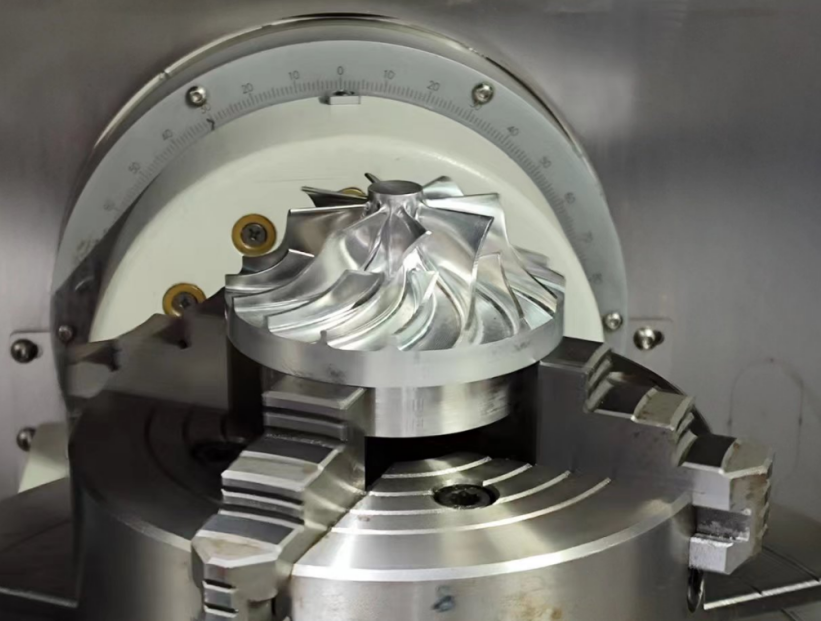
Machined Finish:
For parts that require high precision, secondary machining is necessary. The highest achievable precision is +/- 0.02mm. For parts that require this type of post-processing, it is essential to leave enough cutting allowance before printing. After the post-processing, the printed parts can achieve the normal precision and surface smoothness of CNC machining. It also opens up possibilities for other additional post-processing techniques.
Media Blasting surface finishes:
Media blasting used in metal 3d printing, is a highly effective method that utilizes compressed air to propel blast media, such as alumina, stainless steel shot, metal powder, or glass beads, onto a part’s surface. This process helps wear down the surface and achieve a uniform matte or shiny finish.
It is particularly advantageous for tasks like removing discoloration, blending surface scratches, and mitigating tool marks. Importantly, media blasting does not compromise the dimensional accuracy of parts and can be completed in just a matter of minutes.
The media blasting process’s aggressiveness can be tailored by adjusting the air pressure. Lower pressures are suitable for altering the surface color of a part, while higher pressures with steel shot or glass beads can effectively deburr the surface, enhancing its smoothness and overall appearance.
 Glass bead blasted surface. It results in a satin and uniform finish.
Chemical Surface Treatment:
Chemical treatments such as etching or passivation can be used to alter the surface finish of metal 3D printed parts. These treatments can remove impurities, improve corrosion resistance, or create specific textured patterns on the surface.
However, before carrying out such surface treatments, it is necessary to polish and sand the surface of the samples to increase their durability.
Anodizing, painting:
Similar to CNC machining, these processes are also applicable to metal printed parts. However, compared to CNC machining, the surface finish of metal printed parts is generally poorer. If direct oxidation or painting processes are applied, the color of the finished parts may appear inconsistent, and visible lines or pits may be present. Therefore, some post-processing is required before performing such treatments.
For parts with less demanding surface requirements, bead blasting and tumbling can be performed on the samples. For parts with higher surface quality requirements, fine polishing and polishing treatments can be carried out.
Tumbling:
This process is very similar to traditional polishing techniques used in jade and jewelry making. The equipment principles and materials used are nearly identical. When determining whether a sample requires tumbling, the most important factor is to observe if there are delicate details on the surface that could be easily damaged, such as threads or thin-walled structures. In such cases, caution should be exercised when using this process.
The main material used in tumbling is small stones with triangular edges, along with some incremental additives. After undergoing tumbling, the surface of the samples appears shiny and polished.
The post surface finishes for metal 3d prints appeared first on IN3DTEC | Prototyping & On-demand manufacturing services.
]]>The post Guide for surface roughness appeared first on IN3DTEC | Prototyping & On-demand manufacturing services.
]]>
The post Guide for surface roughness appeared first on IN3DTEC | Prototyping & On-demand manufacturing services.
]]>The post Electroplating Vs Physical Vapor Deposition (PVD) Coating appeared first on IN3DTEC | Prototyping & On-demand manufacturing services.
]]>
The post Electroplating Vs Physical Vapor Deposition (PVD) Coating appeared first on IN3DTEC | Prototyping & On-demand manufacturing services.
]]>The post VaporFuse Surfacing – an enhanced post treatment for your 3D parts appeared first on IN3DTEC | Prototyping & On-demand manufacturing services.
]]>
The post VaporFuse Surfacing – an enhanced post treatment for your 3D parts appeared first on IN3DTEC | Prototyping & On-demand manufacturing services.
]]>